 It’s a guy thing. Bigger is better. I had a chef-boss once, Lenny. He was about 6’ 6” and a former Hell’s Angel, a fairly imposing guy. When it was his turn to make the meatloaf, he’d fill an entire sheet pan (the restaurant kind, you know—the size of a football field) with two big fat long loaves, which we’d sell by the slice. (This was a glamorous establishment, you can tell.) When it was my turn, I’d shape the meatloaf into cute little “mini” loaves. At first Lenny just scowled at me, but then he figured out he could slap a higher price on mine and call it a day. “Girls,” he’d say, and shake his head.
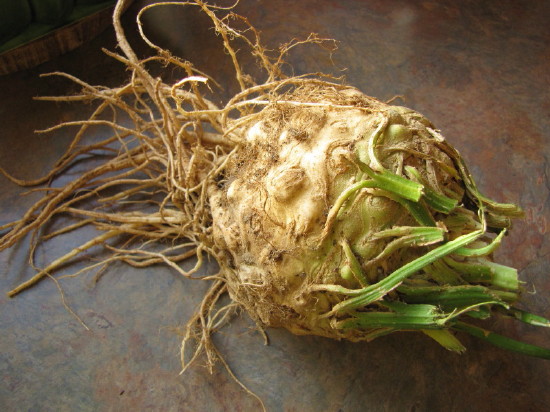
So when my friend Roy offered to pick up my CSA share the other week and returned with two of the most ginormous celery roots I had ever seen, I didn’t say anything. I just chuckled. You know, it’s always risky to have someone else select your produce for you, but this is a guy I trust implicitly. After all, he can pick out a ripe cantaloupe from a mile away, and I certainly can’t do that. Anyway, in this particular case, bigger can be an advantage, so all was fine.
Celery root has an image problem, it’s true. It needs a marketing makeover, starting with its true name—celeriac. Eek. Who wants to eat something that sounds like a medical condition? I say, call it Cinderella, because beneath the drab wardrobe—that gnarly skin—beauty awaits. (And versatility.) Ironically, it’s probably the skin that scares people away, yet it’s actually much easier and quicker to hack off the tops and sides of a celery root with a sharp knife than it is to, say, laboriously peel a butternut squash. So don’t be afraid to go at it; just choose the biggest roots. Since that tough skin also tends to burrow down into the flesh in places, you can wind up devastating a small root by the time you cut off all the skin. A bigger root will yield a higher flesh-to-skin ratio.
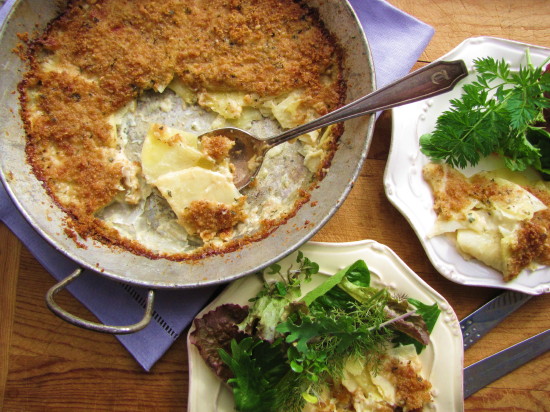
The cool thing is, once you get to that crisp, white, celery-scented flesh, your options are wide open. You can roast or sauté it, add it to stews and braises, and even eat it raw in salads. (See 10 Things To Do with Celery Root.) But my favorite thing to slip it into is a creamy gratin. This darn thing is so hardy it could be dinner with a salad. But it loves a slice of pot roast nearby, too.
- ½ teaspoon unsalted butter
- ¾ cup fresh breadcrumbs
- 1 tablespoon extra-virgin olive oil
- 1½ teaspoons chopped fresh thyme
- ¼ cup finely grated Parmigiano Reggiano
- Kosher salt
- ¾ cup heavy cream
- ½ cup plus 2 tablespoons low-sodium chicken broth
- 1 teaspoon Dijon mustard
- ½ pound Yukon Gold potatoes (about 2 large or 3 medium), peeled
- ½ pound (8 ounces, about ¾ of a large peeled root) celery root, trimmed and thoroughly peeled
- Freshly ground black pepper
- ¾ cup grated Gruyère or Swiss cheese
- Preheat the oven to 350 ° F. Rub a 5- or 6-cup shallow gratin dish (or a 9.5 inch round pie plate) with the butter.
- In a small bowl, combine the breadcrumbs with the olive oil, a big pinch of salt, ½ teaspoon of the chopped thyme, and 2 tablespoons of the Parmigiano.
- In a liquid measure, combine the cream, broth, and mustard.
- Cut the potatoes in half lengthwise and turn the halves cut side down on a cutting board. With a sharp knife, slice the halves across as thinly as you can (between 1/16 and ⅛ inch is ideal) so that you have thin half-moon pieces. Cut the celery root into quarters, and slice it as thinly as the potato.
- Put the potatoes and celery root in the mixing bowl. Add ¾ teaspoon salt, several grinds of fresh pepper, the gruyere or Swiss cheese, the remaining Parmigiano, the remaining 1 teaspoon thyme, and the cream mixture. Mix well. Using your hands, lift the potatoes out of the bowl and transfer them to the gratin dish, arranging them as evenly as possible. Pour and scrape the liquids and anything remaining in the bowl into the gratin dish and distribute everything evenly, adjusting the potatoes as necessary to get an even top. Using your palms, press down on the potatoes to bring the liquids up and around them as much as possible. (It won’t necessarily completely cover them.) Cover the top evenly with the breadcrumb mixture.
- Bake until the potatoes are tender when pierced with a fork (check the middle of the dish as well as the sides), the breadcrumbs are brown, and the juices around the edges of the gratin have bubbled down and formed a dark brown rim around the edge, 55 to 65 minutes. Let cool for about 15 minutes before serving.


