Tag Archives: GINGER

A Few Small (and Big) Ways to Use Miso In Recipes


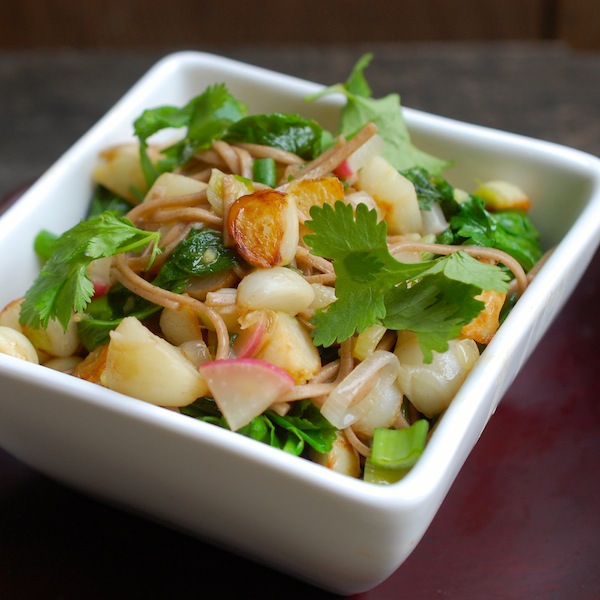
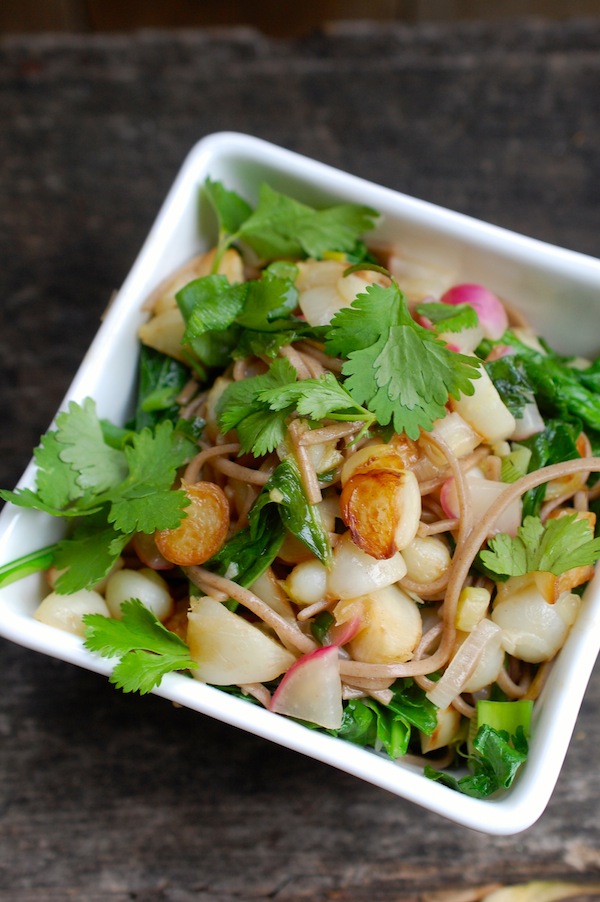
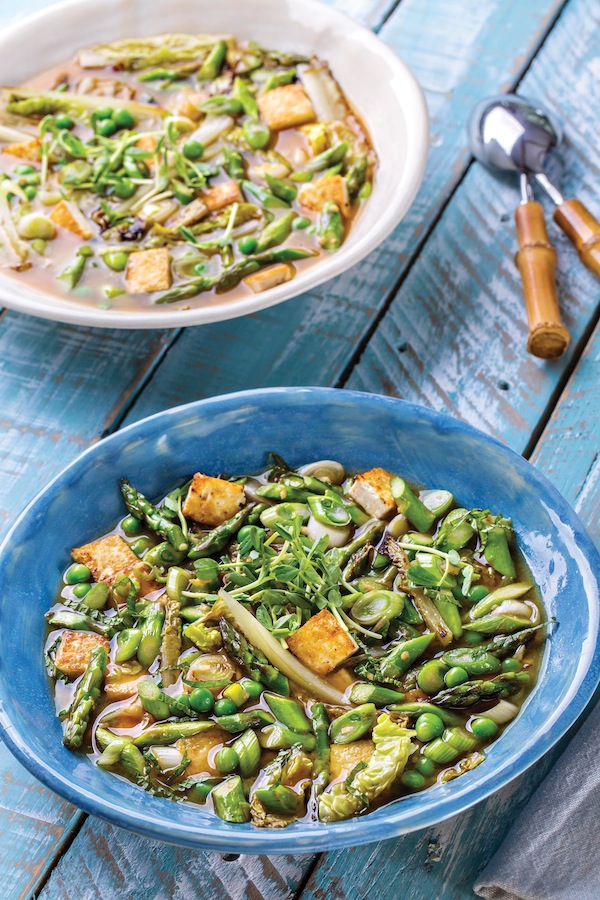
When I tiptoed over the mostly-vegetable line into the all-vegetarian world, I finally got friendly with miso. So when I wrote Simple Green Suppers, I took advantage of miso’s deep flavors in several different ways. Probably my favorite recipe is a simple Lemon Miso Butter (great on sautéed vegetables or in grain dishes), but I also use miso in a delicious Crystallized Ginger-Miso Dressing (on an asparagus and grapefruit salad, and more), and in soups and broths, including the wonderful Spring Miso Broth with Stir-Fried Asparagus, Romaine, Scallions, Tofu, and Mint recipe pictured above.

If you’re not friendly with miso yet, here’s a little background: Miso is a nutritious fermented bean paste, and making it is an ancient Japanese craft. Usually, fermentation begins with soybeans, salt, and koji (a fermenting fungus); sometimes grains or legumes like barley, rice, or chickpeas are added. The miso is aged for varying lengths of time; generally older misos will have more umami flavor and the saltiness will have mellowed somewhat.

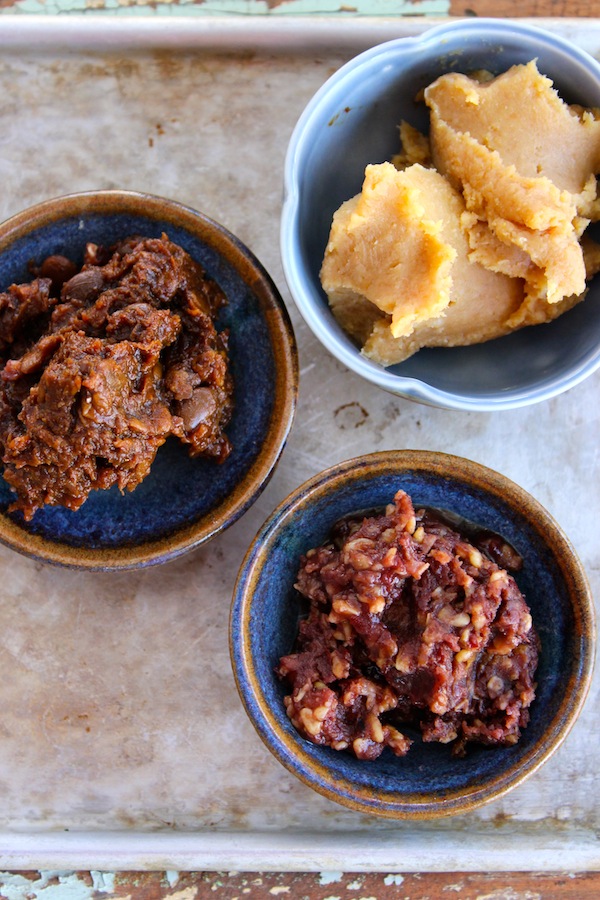
The color of miso will tell you something, too. Generally, the lighter colored misos are the mildest (and most versatile). I use white (sometimes labeled yellow) shiro miso most often, especially for dressings and sauces (top right in photo below). But I also like the darker misos—in broths and soups especially. Great miso is now made in the U.S. In fact, my favorite miso is made right here in Massachusetts, by the South River Miso Company in Conway. I especially like their one-year azuki bean miso (bottom right below) and their three-year barley miso (middle bowl, below), but all of their varieties are delicious and worth seeking out.

However, you don’t have to go out of your way to find miso. Most major supermarkets and all natural food stores carry at least a small variety of misos. All misos have an alluring sweet-salty-funky flavor that’s hard to beat for flavor-boosting.

It’s fun to try out a range of misos; just know that you may need to use a little less of a darker miso or add a little more water (or other ingredients) to taste. A good starting point for soup is one tablespoon per cup of water. If you like, you can strain your broth if using a chunky artisan miso. Keep in mind that all miso pastes destined for soups should be dissolved in hot water, but never boiled. Boiling can destroy flavor and nutrients.

So now, time for you to get friendly with miso, too—though maybe you already are! Either way, I think you’ll enjoy these two recipes. (And you’ll have to get a copy of Simple Green Suppers for the soup recipe above. I know, what a tease. But just a friendly reminder if you haven’t pre-ordered the book–well, you could certainly do it now.)

Lemon-Miso Butter

Make this handy flavor-booster ahead; cover and keep in the fridge for up to a week. In Simple Green Suppers, I use this butter in a recipe for Stir-Fried Black Rice with Baby Bok Choy and Asparagus, and in a recipe for Parsnips and Creminis with Wheat Berries. But you can use it on any stir-fried or sautéed veggies or with rice; be sure to add the butter to the recipe while the veggies or grains are still hot. Double this recipe if you like. (If you need to soften butter quickly to make this, cut it into a few pieces and microwave for a few seconds, but don’t melt it.)

Makes ¼ cup

2 tablespoons unsalted butter, softened

2 tablespoons white (Shiro) miso

1 teaspoon freshly grated lemon zest

In a small bowl, combine the butter, the miso paste, and the lemon zest. Use a small silicone spatula or wooden spoon to mash together until well combined.

Recipe copyright Susie Middleton, from Simple Green Suppers: A Fresh Strategy for One-Dish Vegetarian Meals (Roost Books).

Crystallized Ginger-Miso Dressing

I have to admit this dressing is one of my favorite recipes. It features crystallized ginger with assists from lime, maple, and miso. I love it on an Asparagus, Grapefruit, and Sushi Rice recipe in Simple Green Suppers, but it is equally good with broccoli, green beans, cabbage, or lettuce. Double or triple if you like.

Yields about 1/3 cup

1 tablespoon rice vinegar

1 tablespoon plus 1 teaspoon fresh lime juice

1 tablespoon plus 1 teaspoon minced crystallized ginger

1 tablespoon maple syrup

1 tablespoon minced cilantro

1½ teaspoons white (Shiro) miso

In a small bowl, combine the rice vinegar, the lime juice, the crystallized ginger, the maple syrup, the cilantro, and the miso. Whisk well.

Recipe copyright Susie Middleton, from Simple Green Suppers: A Fresh Strategy for One-Dish Vegetarian Meals (Roost Books).

Top Photo by Randi Baird, Randi Baird Photography


How DO You Cook Those Japanese Baby Turnips, Anyway?

DSC_5455bunch 2We are just coming to the end of our first-ever harvest of Tokyo turnips, aka Japanese baby turnips. They aren’t really babies, but they are really delicious and beautiful and tender and juicy. (The greens are delicate and tasty, too.) We’ve never grown them (or a similar variety called Hakurei that’s popular at farmers’ markets) before, so I am pretty darn excited that they did well, and I can’t wait to grow more. I’m sure our cool weather helped, so I probably won’t seed again until fall.

It’s unusual for me to sell a vegetable at the farm stand that I haven’t cooked with much. And while I could certainly guess by the juicy raw texture and flavor that both minimal cooking (steaming, quick-braising, glazing) and browning (roasting, sautéing and stir-frying) would probably work with these, I couldn’t quickly reference one of my own recipes to help people cook them.

photo-64Fortunately, many of our farm stand customers are adventurous and competent cooks, so several of them forged ahead without me! One woman found a recipe for a nice sauté with potatoes in my fellow Island cookbook author friend Cathy Walther’s Greens, Glorious Greens, and on FaceBook, another cookbook author friend, Diane Morgan, suggested finishing a sauté with miso butter. I don’t have Cathy’s Greens book, though I know it’s a classic and well worth checking out, but I do have Diane’s award-winning Roots, and I can tell you there are more than a few really delicious recipes for turnip dishes in it, including one called Kashmiri-Style Turnips with Greens that led me to think I wasn’t crazy to want to pair cilantro (and ginger) with the baby turnips. The cilantro is flourishing in the cool spring garden, alongside the turnip bed.

Today (thank God for the rain!) I finally got a chance to mess around with the Japanese turnips in the kitchen. Since we had sold all the good-sized and blemish-free roots at the farm stand, I was left with only teeny-tiny roots and some bigger damaged roots, so I had no choice but to cut everything about ½-inch in size. (That meant no cutting for the teeniest mini-marbles.) But I think I would favor that size anyway—or wedges if all my roots were similar sized—for the quickest cooking. I did both a quick par-boil and a quick sauté, adding the greens only briefly to wilt at the end in the sauté , and with lemon and butter, found that the baby turnips really do make a super-quick spring side dish.

DSC_5438

DSC_5233Then I indulged my desire to go Asian, and did a stir-fry with soba noodles—and ate the whole thing for lunch. (It would have served two easily with some grilled shrimp. Photos very top and below.) Originally I thought I might go all the way and turn it into an Asian noodle soup, as the greens would be so perfect for one of these. (And one small turnip—generally about 2 inches in diameter—has a lot of greens attached.) But I was afraid the turnip roots would get lost in the soup, so I kept it noodle-y. I’m including the recipe below in narrative form, as I wouldn’t want to give you a set-in-stone recipe without testing again with more uniform turnips and more exact proportions.


To make Soba Noodles with Stir-Fried Baby Turnips, Ginger & Cilantro: DSC_5470

Cook a handful of soba noodles separately in boiling water. (Follow the package directions, but shorten the cooking time a bit.) Drain and hold. Get out a non-stick stir-fry pan or a big non-stick sauté pan and heat just a couple teaspoons of vegetable oil (I used grapeseed oil) over medium heat. Add about a cup of diced baby turnip roots (trimmed) and a couple big pinches of kosher or sea salt. Cook, stirring, until lightly browned, about 5 minutes. Add a teaspoon of chopped fresh ginger, one-half teaspoon of chopped garlic, about ¼ cup thickly sliced spring onions or scallions, and a couple tablespoons of quartered, sliced radishes. (If I’d had a small Serrano pepper, I would have added a bit of it, chopped, too.)

Stir, cooking, until fragrant and a bit softened. Add a half cup of chicken broth or other broth and about 2 cups torn, stemmed turnip greens. Stir until the greens are wilted. Add the soba noodles and stir well to combine. Add a mix of fresh lemon (or lime) juice and soy sauce (one-half to one teaspoon of each or to taste) and a tablespoon or more of torn fresh cilantro leaves. Stir, remove from the heat, transfer to a serving bowl and garnish with a bit more cilantro and some sliced spring onion or scallion green tops.  (Serves 1 or 2)


photo-66P.S. I almost completely forgot. The first thing I actually did with the baby turnips a few days ago was to add them to one of my slow-sautes with carrots and potatoes. I’d forgotten I had a few in the fridge, and cut them just as a i was starting to cook the potatoes and carrots. They cook a little more quickly than purple-topped turnips, so you can certainly use them deliciously in one of these, but I might add them half-way through cooking.


On the Menu: Roasted Butternut Squash with Cranberry-Ginger Butter and Toasted Walnuts

A few weeks ago I mentioned my imaginary friend Shorty. Things have gotten worse. Now I have a whole bunch of imaginary friends. I had a party and invited them over two nights ago. It was a spur of the moment thing, so there was no time to invite real friends.

I had been making my black bean chili all afternoon—one of the last recipes for the new book, and one I’m particularly excited about. But once I had a big pot of the stuff on my hands around 6 o’clock, I realized I needed to get an accurate read on the portion sizes—not just of the chili, but of the rice, the vegetables, and the garnishes that go with it. So I made all the accompaniments and then started putting out little bowls (each for a half-size portion), figuring I’d kill many birds with one stone. (Our pet, Ellie the Lovebird, with whom I have a tenuous relationship, did not like this analogy.)

Not only did I want to test proportions, but I wanted to test different taste combinations. So I put little name cards next to the bowls as a fun way to indicate the different combinations. “I think I’ll blog about this,” I told Roy, who was looking at me with amusement. “No, I think I should write the next blog,” he said, “about what it’s like to live with a cookbook writer on deadline.” Needless to say, I’m keeping him far away from the keyboard.

Happily both Roy and I and all of the imaginary guests (or as best as we can figure) liked all of the chili combinations. But everyone’s favorite vegetable topping for the bean chili was roasted butternut squash. I nibbled on the squash as we were cleaning up (the guests did not hang around to do the dishes), and I thought about what a delicious side dish roasted butternut is, simply diced up and cooked on high heat. But even better, a super-quick flavored butter (my favorite has lots of chopped dried cranberries, fresh ginger, and a little lime in it) turns this earthy-sweet vegetable into a real star. So I’m passing along that recipe—since I can’t share the chili recipe just yet.

The only problem with this recipe is portion size (ack—the bane of my existence!). Even if you scooch up the amount of raw squash to 1 1/4 lbs. (any more than this amount on one large sheet pan will steam, not roast), you still only wind up with about enough to serve 3 people as a side, because this is so tasty. At least you won’t have to invite any imaginary friends to eat the leftovers.

Roasted Butternut Squash with Cranberry-Ginger Butter & Toasted Walnuts

______________________________________________

1 to 1 1/4 lb. peeled butternut squash, cut into 1/2-inch dice

3 tablespoons extra-virgin olive oil

Kosher salt

2 tablespoons unsalted butter

3 tablespoons chopped dried cranberries

1 teaspoon chopped fresh ginger

1/4 teaspoon finely grated lime zest

½ teaspoon fresh lime juice; more if needed

2 tablespoons finely chopped toasted walnuts

2 teaspoons chopped fresh cilantro (optional)

________________________________________

Preheat the oven to 450°F. Line a large heavy-duty rimmed sheet pan with a piece of parchment paper. In a mixing bowl, toss the squash with the olive oil and 1 teaspoon salt. Spread the squash in one layer on the sheet pan. Roast, flipping once with a spatula after about 18 minutes, until the squash are tender and  brown on the bottom and around the edges, about 12 minutes more or 30 to 32 minutes total.

Meanwhile, melt the butter in a small saucepan over low heat and add the cranberries, the fresh ginger, and the lime zest. Stir well and cook to soften the cranberries a bit, about 1 minute. Take the saucepan off the heat while waiting for the vegetables to finish roasting.

Transfer the squash to a mixing bowl. Reheat the cranberry butter to loosen it up if necessary. Add the ½ teaspoon lime juice, stir, and pour and scrape all of the cranberry butter into the bowl with the squash. Toss thoroughly but gently. Taste and add up to ½ teaspoon more lime juice if desired. Add the walnuts and cilantro (if using) and toss again. Serve right away.

Serves 3 (maybe 4!) as a side

The Perfect Match: Carrots + Stir-Fry Pan

I didn’t always love carrots, but two things changed that.  First, I grew my own carrots last summer—and toted home fistfuls of freshly dug carrots from my CSA farm every week. These sweet and crunchy little wonders bore no resemblance in taste or texture to the poly-bagged grocery store carrots harvested light-years ago and shipped from a galaxy far, far away.

Secondly, when I started writing my vegetable cookbook, Fast, Fresh & Green, I figured the familiar and friendly carrot would need to star in at least a few side dishes. So I cooked carrots—a lot. In the back of my mind were bad memories of overcooked (mushy) and under-flavored (wan and vegetal) carrots from bad convention dinners and childhood TV dinners.

I needed to erase that memory. I figured that any method that let the carrots brown up a little first (caramelization=deep, sweet flavor) and then just cook through until barely tender would do the trick. Stovetop braising, roasting, sautéing—these methods all worked, but I discovered that the hands-down easiest and most efficient way to get great carrot flavor fast is stir-frying.

By stir-frying, I don’t mean leaping flames and a professional wok. I mean a wide, round, bowl-shaped non-stick stir-fry pan (my favorite is a Circulon) on a home burner. These pans are great for two reasons—the large surface area lets more vegetables come in contact with the hot pan for more browning, but at the same time, the depth and slope of the bowl allows the vegetables to steam a bit while they cook, too.  (The pan should be moderately full for the veggies to do that steamy thing—too empty, and the veggies will tend to burn.)

Cooking carrots in a stir-fry pan is such a no-brainer that I was sort of embarrassed to espouse the technique in my book. But who doesn’t like easy? And the result is so fabulous—deeply browned around the edges and just cooked through,  the carrots are nutty and sweet tasting. You can finish off the carrots simply with chopped fresh ginger and a squeeze of lime, or go crazy with flavors.

I do get a teensy bit fussy (or so my mother says) about how I cut my carrots for a stir-fry. I like slender sticks; they don’t have to be perfect—just try to keep them all about the same thickness.

Gingery Stir-Fried Carrots with Cranberry and Orange

Serves 3

1 pound carrots

1 tablespoon cranberry juice (unsweetened)

1 tablespoon fresh orange juice

1/8 teaspoon balsamic vinegar

½ teaspoon kosher salt

1 tablespoon vegetable oil

¼ cup (about 2 small) sliced scallions, white and green

2 teaspoons minced fresh ginger

pinch red pepper flakes

1 teaspoon unsalted butter

Trim and peel your carrots and cut them into sticks that are 2 to 3 inches long, and between ¼ and 3/8 inch thick. Combine the cranberry juice, orange juice and balsamic vinegar in a small bowl.

In a large (12-inch) nonstick stir-fry pan, heat the vegetable oil over medium-high heat. When the oil is hot (it will loosen up), add the carrots and salt and stir well with tongs. Cook, stirring only occasionally and spreading out the vegetables after every stir, until the carrots are browned in places (they should have lost their stiffness; some will be slightly blackened), about 10 minutes. Adjust the heat up if the carrots are not browning after a couple minutes; lower the heat if the carrots are browning too much after five or six minutes.

Turn the heat to low, add the scallions and ginger, and stir until fragrant, about 30 seconds. Turn off the heat, add the cranberry/orange/balsamic combo and stir until the liquids have mostly reduced and been absorbed. Take the pan off the heat, add the butter, and toss and stir gently until it melts. Serve warm.