Category Archives: starters

Tart Art: Recipes for Sweet or Savory Rustic Tarts

DSC_0626I’ve been looking for a great excuse to repost this blog on rustic tarts. Well, it being the eve of you-know-what, I don’t thing I even have to mention why you might want to totally distract yourself with an incredibly delicious cooking project. (Perhaps you don’t have a TV or the internet in your kitchen.) But even if you don’t feel like cooking today or tomorrow, chances are that either a sweet or savory tart might fit perfectly into one of your holiday menus. So, Ta da! A repost of where to find directions to all my yummy rustic tart recipes.

DSC_9313

Sweet or savory, these open-faced pies can be everything from appetizer to dessert—and even breakfast. A couple years back, I wrote and photographed a story called “Tart Art” for Martha’s Vineyard Magazine, and now the recipes are all online. It’s a great place to go for my all-purpose, buttery, flaky dough recipe—and to find recipes for both my versatile fruit filling (apples, pears, or plums) and for two different savory fillings.

DSC_0706

The fruit fillings work for sweet rustic tarts that are as delicious for dessert as they are the next day for brunch or an easy leftover breakfast. And if you’ve got a copy of Fresh from the Farm on hand, you can find one of my favorite variations in the recipe for Little Pear Crostatas with Hazelnut Crisp Topping. (Rustic tarts go by the name crostata in Italy and galette in France.)

DSC_1548

The savory fillings I did for Martha’s Vineyard Magazine—Savory Cabbage, Apple & Cheddar and Savory Roasted Butternut, Pear, and Cranberry—are variations on the fillings I did for my tart chapter in The Fresh and Green Table. Not only are these savory tarts deeply flavored and satisfying (great with soup or salad), but they are a lot of fun to put together.

DSC_1915

For step by step assembling instructions, you’ll want to look back at the directions and the photos I included in a previous blog, which includes a link to one of the recipes from The Fresh & Green Table. (The Seven Treasure Roasted Winter Veggie Tart is also a favorite in The Fresh & Green Table.) And over on the Martha’s Vineyard Magazine website, you’ll see that I’ve given you options for dividing the dough into either two or four pieces to make two bigger or four smaller tarts.

So you’ve got options.

And when summer comes around (we can be hopeful, right?) don’t forget about my most favorite tart of all—the Roasted Tomato Rustic Tart in Fresh from the Farm!

xroastedtomatotart


Deviled Eggs and Popovers, Bread Pudding and Frittata Recipes–Happy Easter Eggs!

 deviled eggs

With hundreds of chickens (how many exactly, we’re not sure, as witnessed by a heated argument last night about this statistic), Easter eggs take on kind of a special importance around here. I started my day off washing eggs, and Roy will wash more when he gets home. The farm stand will be busy all weekend, with lots of seasonal residents on Island and, of course, eggs on everyone’s mind.

So since we’re busy here today, I am doing a quick round-up of some of my favorite egg recipes on Sixburnersue.com, and also giving you, right here, our farm recipe for deviled eggs, which happens to feature a yummy spinach-basil pesto recipe. (Recipe is from Fresh From the Farm: A Year of Recipes and Stories.) I hope you have a joyful—and delicious—Easter weekend. (And, oh, we have somewhere between 400 and 500 chickens, with 200 more on the way…we think.)

Here are my family’s favorite, popovers.

Here’s a nice asparagus bread pudding for a crowd.

Here’s a lovely leek, spinach, thyme, and gruyere frittata with more egg ideas, and here’s another delicious frittata with fingerling potatoes and goat cheese. 

And one of my very favorites–the Green Island Farm egg sandwich.

And here are those delicious deviled eggs:

Deviled Eggs with Spinach, Basil & Toasted Pine Nut Pesto  

Recipe copyright Susie Middleton, from Fresh From the Farm (Taunton Press, 2014) Photo at top by Alexandra Grablewski.

Even if you don’t live with 557 hens and a man who’d be happy eating meat loaf and deviled eggs every day, you should still have a great recipe for deviled eggs in your repertoire. Our favorite version goes green (and tasty) with a little Spinach, Basil & Toasted Pine Nut Pesto (recipe below) and a touch of lemon zest. No fancy piping required, though we do like to garnish with a tiny basil leaf and a pine nut. Wait to garnish until just before serving.

Makes 12 deviled eggs

__________________________________________

6 Hard-Cooked Eggs (see note below), peeled and sliced in half lengthwise

3 tablespoons mayonnaise

1 1/2 teaspoons Spinach, Basil & Toasted Pine Nut Pesto (recipe below), drained of excess olive oil

1/2 teaspoon fresh lemon juice

1/4 teaspoon freshly grated lemon zest

Kosher salt

Freshly ground black pepper

12 tiny fresh basil leaves, for garnish

12 whole toasted pine nuts, for garnish

_________________________________________

Gently scoop or squeeze out the yolk from each egg half. Arrange the whites on a plate.

In a small bowl, mash together the yolks, mayonnaise, pesto, lemon juice, lemon zest, a pinch of salt, and several grinds of fresh pepper until you get a smooth, pale-green filling. (I use a small silicone spatula.) Using a small spoon or mini spatula, spoon or dollop the mixture evenly back into the egg white halves. (I like to let the mixture sort of fall off the spoon, but do whatever works for you!)

Garnish each half with a basil leaf and a pine nut.


Spinach, Basil & Toasted Pine Nut Pesto

Recipe copyright Susie Middleton, from Fresh From the Farm (Taunton Press, 2014)

Lovely green spinach leaves are my inspiration for a greener basil pesto.    Together with toasted pine nuts and lots of Parmigiano, they make a delicious, versatile sauce, which I use not only in deviled eggs, but over grilled veggies, in vinaigrettes, and even as a burger mix-in. Don’t forget to toast the pine nuts before you make the pesto.

Yields 1 1/3 cup 

_________________________________

1 large clove garlic

1 1/2 cups packed fresh baby spinach leaves

1 1/2 cups packed fresh basil leaves

1/3 cup toasted pine nuts

1/2 cup extra-virgin olive oil; more if needed

1/3 cup grated Parmigiano-Reggiano

Kosher salt

Freshly ground black pepper

1 teaspoon fresh lemon juice

_______________________________

In the bowl of a food processor, process the garlic clove until it is minced. Add the spinach, basil, pine nuts, and 1 tablespoon olive oil. Process, stopping to scrape down the sides as necessary, until finely chopped. Add the Parmigiano, 1/4 teaspoon salt, several grinds of fresh black pepper, and the lemon juice and process until well-combined. With the motor running, gradually pour the remaining olive oil through the feed tube and process until you get a nice smooth pesto. If the pesto is too stiff, add a bit more olive oil, 1 tablespoon at a time, until you get the right consistency.


To Hard-Cook Eggs: To cook eggs for salads or to use as deviled eggs, put them in a saucepan wide enough to hold them in one layer and cover them cold water (that comes up an inch over the eggs). Bring the water to a slow boil over medium-high heat and once the water is boiling, immediately remove the pan from the heat. Cover the pan and steep the eggs for 12 minutes. Carefully drain off the hot water and run cold water over the eggs until they are cool to the touch. (Or plunge into an ice-bath.) Refrigerate until completely chilled before peeling.


Delicious Roasted Garlic and Cranberry Bean Dip

photo-161

Depending on the season, the month, the hour, the minute, my vote for “prettiest garden vegetable” changes. My allegiance is fleeting, I know, but I can’t help it when something new bursts on the scene. Right now, I am totally captivated by cranberry beans. This year’s variety, planted in July after the peas came out, is Vermont Cranberry Bean, and it took a little longer to mature than the similar Borlotti bean I’ve grown in the past. (In the confusing world of bean varieties, there happen to be several different shell beans with similar characteristics but slightly different growing habits that are referred to as cranberry beans.)

But with both the varieties I’ve grown, the “harvest me” sign is the same—the background color of the pod turns from green to white. (The “speckled” foreground color of course is bright pink.) Inside, the beans are plump and pinkish, also having lost all signs of greenness.

As the beans begin to dry out, their color darkens to a deep magenta (on the upper left in the photo above.) You can let the beans dry out either on the plant or in a dry spot if you want to save them to use over the winter. But I prefer to nab the beans at their plump, pinkish stage, because fresh shell beans are a real treat. Their defining characteristic is a very smooth, creamy texture, achieved after simmering for only about 25 minutes. Usually at that point, I will toss the beans in warm garlic and rosemary oil (and sometimes cooked pancetta) and serve them over arugula, Roman-style. Or I will use them as a great excuse to make minestrone. (Either way, their lovely color dulls, unfortunately.)

photo-144

But this year I wanted to do something else with them, and I landed on the perfect thing when I came across an old recipe of mine for a white bean and roasted garlic dip. How much better the cranberry beans would be, I thought, with their lovely texture. Sure enough, when I made the dip/spread/puree yesterday, the texture was almost fluffy and pillowy. And the flavor awesome.

photo-154photo-156I ate some of the puree on toasted ciabatta, but you could serve it with raw vegetables or pita as a dip or even use it as a bed for grilled or roasted lamb or pork.

If you don’t see cranberry beans or any other fresh shell bean in your market this fall, you can make this with dried beans (such as Great Northerns)  that you cook until very tender. Remember to save the cooking liquid to thin the puree a bit.

Roasted Garlic and Cranberry Bean Puree/Dip/Spread

1 ½ cups shelled fresh Cranberry beans (from about a pound of pods)
2 small spring fresh rosemary
6 cloves roasted garlic (see Tip below)
3 tablespoons extra-virgin olive oil
kosher salt

Put the beans, the rosemary, and a pinch of salt in a large saucepan and cover with cold water by at least an inch and a half. Bring to a boil, reduce to a simmer, and cook until very tender, about 25 minutes. You can add about ¼ teaspoon of salt after 15 or 20 minutes if you like. Remove the pan from the heat and use a slotted spoon to transfer the beans to a plate or bowl. Reserve the cooking liquid. (In other words, don’t throw it away, you’re going to use it!). Let everything cool for 10 or 15 minutes. Discard the rosemary sprigs, but don’t worry if a few wayward leaves are left behind to go into the puree.

photo-159In the bowl of a small food processor, combine the beans, the roasted garlic, the olive oil, 2 tablespoons of cooking liquid, and ¼ teaspoon salt. Process, stopping often to scrape down the sides of the bowl, until the mixture is just roughly chopped. Add more cooking liquid, a few teaspoons at a time, if necessary, and continue processing until you achieve a light, creamy texture. (Taste at this point to discern the texture, because the look will still be a bit coarse. You don’t want to process or add any more cooking liquid than is necessary, though this is probably a matter of personal taste!) Serve right away or refrigerate. It will hold well for a day or so. Bring it to room temperature before serving.

Roasting Garlic Tip

Instead of roasting a whole head of garlic, I usually break the head into individual cloves, toss them with olive oil, arrange in a small baking dish, cover with foil, and bake at 375°F for 30 to 35 minutes. Then I pop the cloves out of their papery skins. It’s a little quicker, and maybe a bit less messy, though some of the cloves will brown a bit from contact with the pan. Using all larger cloves is a way around this problem.

When Life Gives You Splitters, Make Tomato Confit

DSC_7815We’re growing a new variety of tomato (which shall remain nameless at this point, as it is not proving itself to be all that it was cracked up to be!), which tends to split. Especially after a lot of rain like we just had. (To be fair, there are some delicious tomatoes that have this trait. Inconsistent water wreaks havoc with tomatoes.)

I don’t like wasting all those splitters. Sadly, we used to feed them to Martha, Opti, Oreo, Sugar and the rest of our original hens. But they are no longer with us, and throwing one bowl of splitters into a yard of 200 hens is hardly fair, so I’ve had to think of other solutions.

DSC_7753

This week I simply cut them all up into chunks, tossed them with olive oil and salt, put them in a heavy roasting pan, and cooked them for about 2 hours at 300°. I checked on them from time to time, stirring and scraping. I cooked them until a lot of the moisture was gone and the texture was kind of jammy. At the very end, I folded in a little minced fresh garlic and a mixture of a small amount of balsamic vinegar and honey, and let the garlic soften and everything infuse for a couple minutes in the oven.

DSC_7772

I left the cooked-down tomatoes to cool for a short spell in the pan, and then tasted. Delicious! Even though these tomatoes didn’t start out with a very robust flavor, roasting them down concentrated their flavor (as roasting always does!). The result was kind of a confit (really just a tomato jam or conserve), though with seeds and skins left in, it might not be everyone’s cup of tea. The seeds and skins don’t bother me, and considering how dead simple this is—and that it greatly extends the life of a bunch of tomatoes that otherwise would probably rot before you could eat them—it’s a no-brainer. You could literally do it with any tomatoes, any time.

DSC_7782

I put the confit in a cute jar just to photograph it—I was not intending to can it or keep it for very long. But I imagine it will keep at least a week in the fridge and would freeze just fine for longer. We’ve put it on top of grilled bread with warm goat cheese, and I’m planning to use the rest in a baked pasta. You could put some on top of scrambled eggs or in a quesadilla (yum), top a pizza or use it as a base for a flavorful rice dish. Why not?

DSC_7820


The Ultimate Destination for Winter Cabbage: A Savory Tart

xTARTS Cabbage 3 
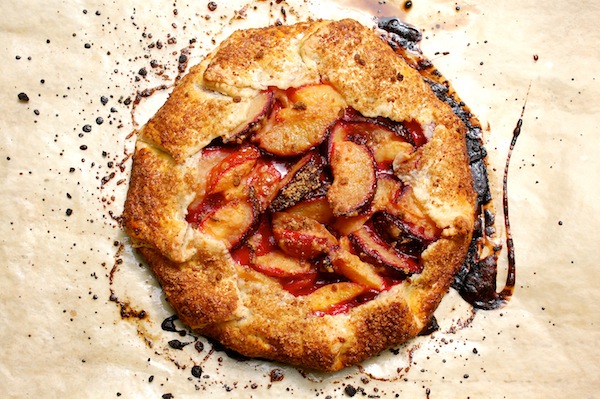
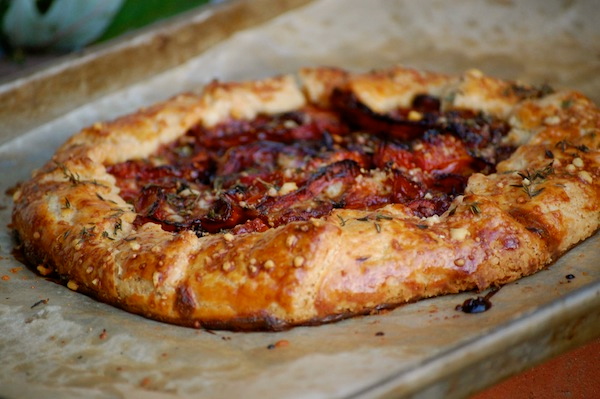
This week I am posting a primer on how to make one of my very favorite things in the whole world–a savory rustic tart (aka crostata or galette). Be sure to check out that post–not only for tips and photos on making the dough and assembling the tarts–but also for the easy food-processor dough recipe, too. Then come back over here for a complete recipe for filling and assembling the cabbage, apple and onion tart (recipe follows). If you’ve got a copy of my cookbook The Fresh & Green Table, you can also use the guidelines over on that post to help you make either the Roasted Ratatouille Tart with Goat Cheese & Mint; the Seven-Treasure Roasted Winter Veggie Tart; or the Roasted Butternut Squash, Cranberry, Shallot & Pecan Tart. There’s also a Rustic Roasted Tomato Tart recipe (my favorite yet) in my new book, Fresh from the Farm: A Year of Recipes and Stories.

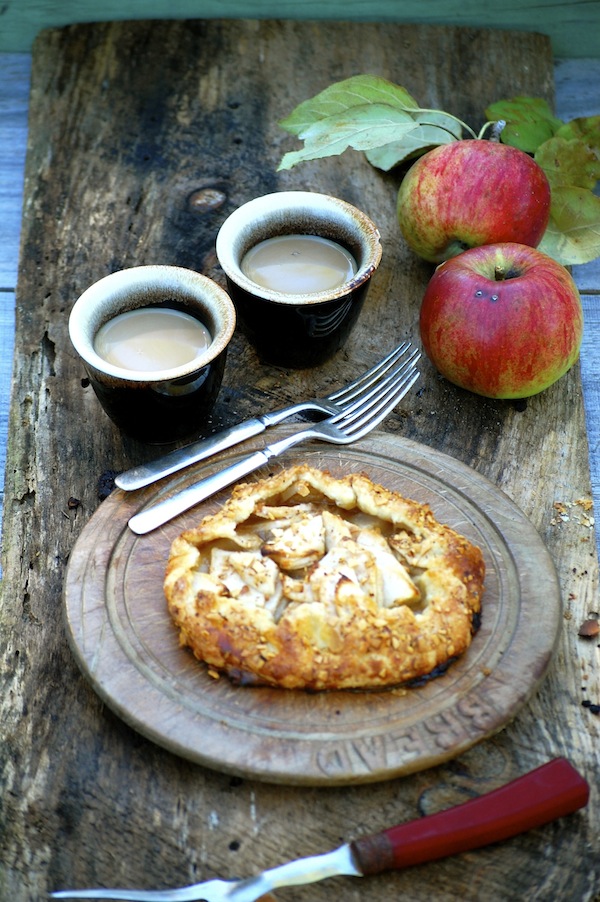
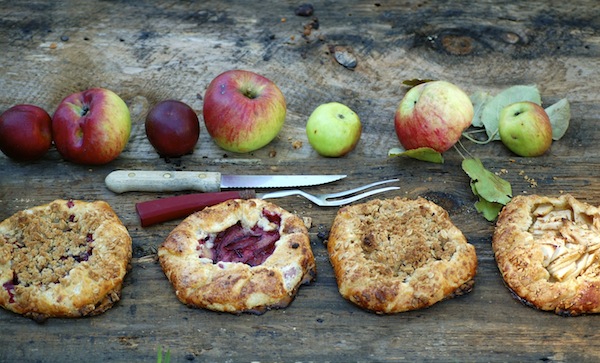
I hope you’ll try one of these fun-to-make free-form tarts. The crust is flaky, buttery, and delicious, and the savory fillings are the perfect counterpart. Serve a slice with a salad or a bowl of soup–or have a piece for breakfast!

PicMonkey Collage


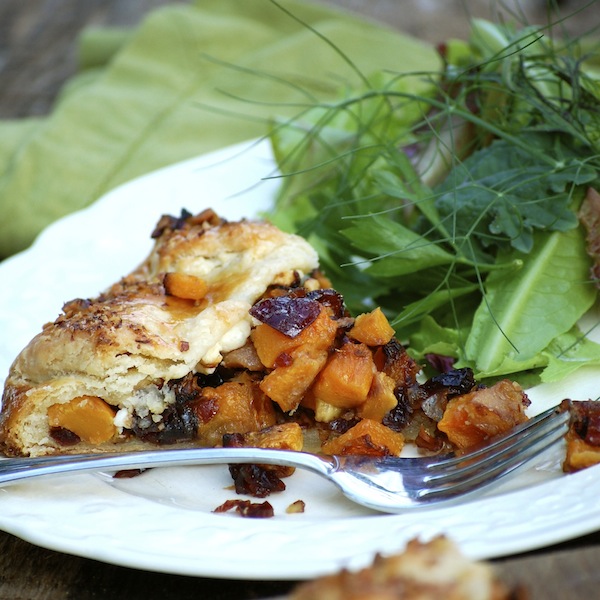
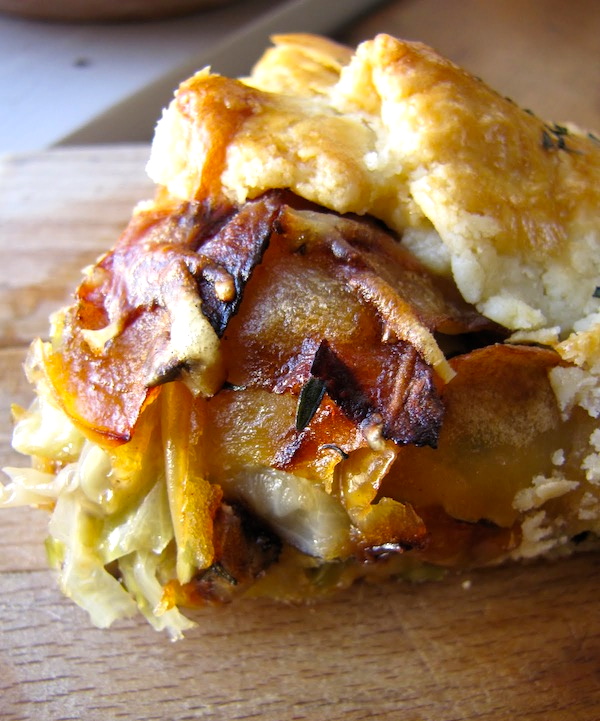
Savoy Cabbage, Apple, Onion & Gruyère Rustic Tart

IMG_5669_1

When I was developing my rustic tart recipes for The Fresh & Green Table, the filling for this tart was the surprise favorite with friends I never thought would be cabbage-eaters. So I highly recommend this as a great way to introduce people to the ethereal (and traditionally Alsatian) combination of sautéed cabbage and onions, nutty gruyere cheese, sweet-tart sautéed apples, perky fresh thyme, and buttery, flaky crust.

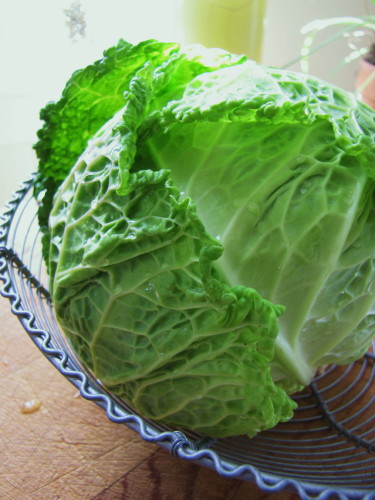
I also recommend closely following my sautéing directions for the filling—especially the cabbage. You’ll be cooking it in a relatively dry pan over relatively high heat, so that it will quickly brown (almost toast) rather than steam. This is the secret to bringing out the wonderfully complex nutty flavor in cabbage. Be sure to use the beautiful crinkly-leaved variety of cabbage known as Savoy for this. (You’ll find it in the grocery right next to green cabbage; it’s round, too, but with dark-green outer leaves.) The filling components cool quickly, so you can make them in about the time you’ll need to let your dough warm up after taking it out of the fridge.

Makes one 8- to 9-inch tart. Serves 4  

____________________________________________________

For the egg wash:

1 egg yolk

2 Tbsp. heavy cream


For the filling:

2 Tbsp. unsalted butter

1 Tbsp. extra virgin olive oil

1 medium onion (6 to 7 oz.), thinly sliced

6 oz. Savoy cabbage, thinly sliced (about 3 cups packed)

1/2 Golden Delicious apple, unpeeled, cored and thinly sliced (about 1/8-inch thick)

kosher salt


For the tart:

3/4 cup (about 3 oz.) grated Gruyère cheese

1 tsp. lightly chopped fresh thyme leaves

flour for dusting

1 disk Savory Rustic Tart Dough (recipe here), made ahead, chilled for at least one hour, and removed from refrigerator 45 to 55 minutes before assembling tart

________________________________________________________________________________

Preheat the oven to 400 degrees F. Set an oven rack in the center of the oven.

Make the egg wash

Whisk together the egg yolk and heavy cream in a small bowl, cover with plastic, and set aside.

Make the filling

In a heavy 10-inch nonstick skillet, heat 1 Tbsp. of the olive oil and 1 Tbs. of the butter over medium-low heat. Add the onion and a pinch of salt, cover, and cook, stirring occasionally, until the onion is limp and translucent, 5 minutes. Uncover, turn the heat to medium, and cook, stirring occasionally, until the onions are golden brown, about another 6 to 8 minutes. Transfer the onions to a plate to cool.

Add 1/2 Tbsp. butter to the pan, turn the heat to medium high, and add the cabbage and another big pinch of salt. Cook, tossing with tongs occasionally (only once or twice at first; let the cabbage have contact with the pan), until the cabbage is limp and nicely browned in spots all over (the thinnest pieces will be all brown but the green color will still be bright in the bigger pieces), about 5 minutes. Transfer the cabbage to a plate to cool.

Take the pan off the heat, and let it cool for a minute or two before returning to the heat. Reduce the heat to medium and add the remaining 1/2 Tbsp. butter. When the butter has melted, add the apple slices, season them with a pinch of salt, and spread them out in one layer (tongs help here). Let them cook undisturbed until very lightly brown on the bottom side, about 2 minutes. Flip and cook until the other side is very lightly browned, another 2 minutes. Transfer the apples to a plate to cool.

Make the tart

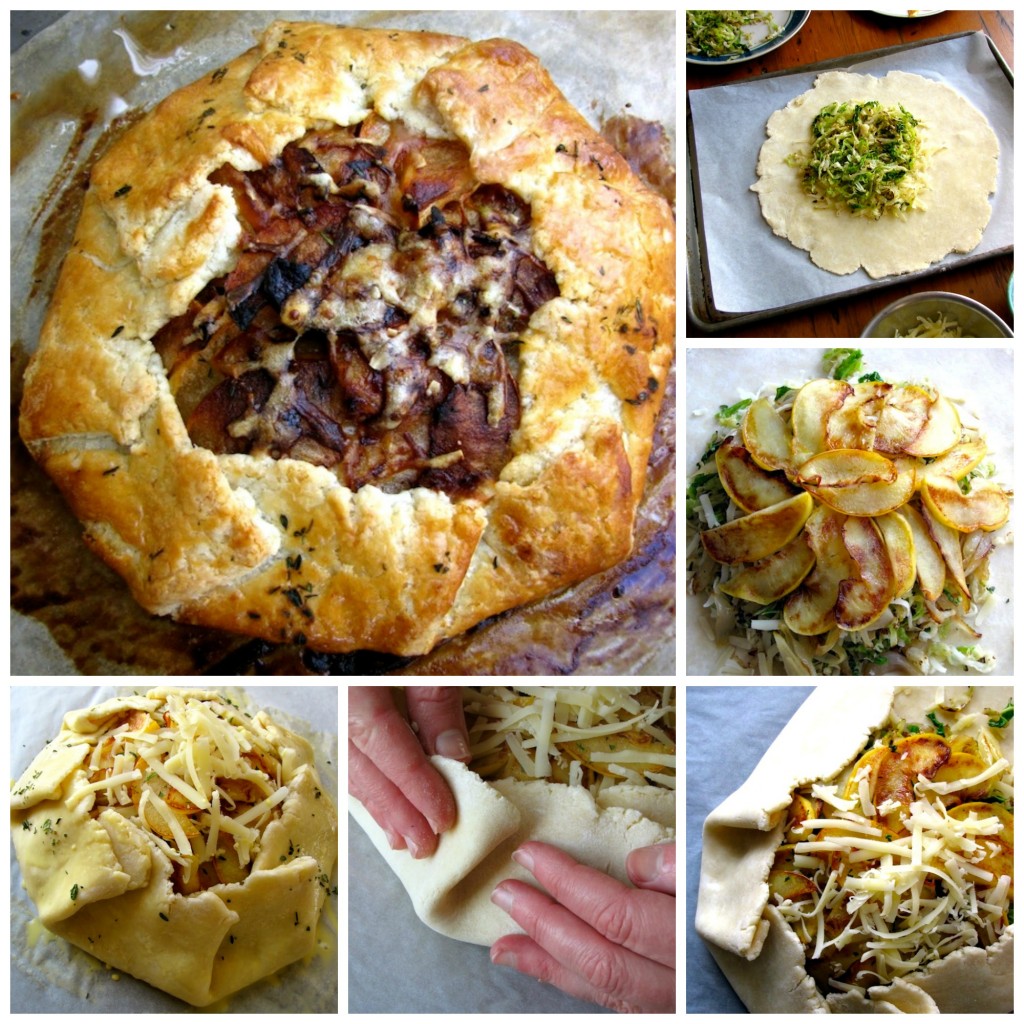
(For help with assembling the tart, check out the “How to Make A Savory Rustic Tart” photos here.)

Line a large heavy-duty rimmed sheet pan with a piece of parchment paper and position it next to a large cutting board or other surface you will use to roll out the dough. Arrange the cabbage, onions, apples, thyme and Gruyère around your work area.

Sprinkle your work surface lightly with flour and spread it around with your hand. Put the disk of dough in front of you and lightly tap it with the rolling pin to start softening and spreading it. Then gently roll it out, lifting and giving the disk a quarter-turn after each roll, until you have a roughly 12-inch circle. Try not to roll your pin over the edges of the dough, as that will tend to make the edges thinner than the center. (If your edges get very ragged or torn, it’s okay to patch them back together or trim them a bit.) If at any time the dough feels like it is sticking, lift it up and toss a bit of flour underneath it and/or over it.  Transfer the dough to the baking sheet by rolling it up or draping it over your rolling pin and unrolling or undraping it on the baking sheet.

Sprinkle a quarter of the Gruyère over the dough, leaving a two-inch border around the edge. Arrange half of the cabbage over the Gruyère. Arrange half of the onions over the cabbage. Sprinkle them with a little bit of fresh thyme, and top with another quarter of the Gruyère. Repeat with the remaining cabbage and onions, and sprinkle again with a little thyme and another quarter of the Gruyère. Arrange the apples, very slightly overlapping, in the center of the tart (they will not cover all the filling). Sprinkle with a tiny bit of thyme and the remaining Gruyère.

Pleat and fold the edges of the dough up and over the outer edge of the filling all the way around the tart.  (You will be folding in that 2-inch border.) You don’t have to go crazy making a lot of pleats—folding a piece of dough in about every 2 to 3 inches around the tart will get you the results you want (you’ll have about 8 or 9 folds).

Brush the edges of the dough with some of the egg wash (you won’t use it all), and sprinkle the edges of the tart with any remaining thyme.

Bake until nicely golden all over and crisp and brown on the bottom (check with spatula), about 38 to 40 minutes. Let cool for a few minutes and use the parchment paper to slide the tart on to a cutting board. Cool for another 5 to 10 minutes before slicing and serving.

Super-Fresh, Super-Fast, Super Bowl Salsa & Guacamole: Recipe Preview, Fresh From the Farm

salsa guac 1

It’s hard not to dream about summer when your teeth are chattering.

Goodness, this cold weather is certainly getting to be a drag, isn’t it? Wouldn’t it be nice if you could walk outside right now, tip toe across the hot grass, swing open the garden gate, and tug a ripe juicy tomato off the vine? Uh, sorry. Not going to happen. I realize it’s not very nice of me to be teasing, and on top of that, I’m going to cheat, too. Because today I am offering you two recipes that are from the Summer section of Fresh From the Farm. So sue me.

guac 3It just so happens that my Lazy Day Summer Salsa with Serranos, Cilantro & Lime (a spoonable, dippable, versatile Mexican-restaurant style sauce) is pretty darn good made with store-bought plum tomatoes—especially if you let them sit on the counter for a few days. Paired with my Double-Cilantro Guacamole (the real deal here, no pureeing or added fillers), these are two of the freshest, healthiest, liveliest additions you can make to your Super Bowl spread. Really clean and fresh-tasting. (And yes, this may be one of the only times you see two Vegan and Gluten-Free recipes together on Sixburnersue at the same time!) Even if you’re not into the whole football thing (and here in New England, with the Patriots now out of it, we suddenly have a lot of people who’d rather shovel their sidewalks than watch the Super Bowl), I bet you’ve got a taco night planned, or you need a good way to liven up a fish or shrimp dish.

Honestly, these two recipes are repertoire essentials.

So I made them both yesterday in order to take pictures (alas, neither of these recipes is among the 200 photos in the book!), and I ate an entire half-batch of the guacamole myself. And the way this salsa comes together in the food processor so fast and easily makes me feel efficient every time I make it. We’re eating leftovers tonight on pork tacos.

cilantro flowers cilantro leavesA Sidenote About Cilantro

Both of these recipes use a good amount of cilantro (and a bit of ground coriander, the seed of the cilantro plant), and now is the time to plan for growing your own this year.

It’s very easy to grow, so order some seeds and plant early. It loves cool spring weather and tends to bolt around the summer solstice. One way to end-around this is to sow seed continuously (once a week or so). This way you can continuously harvest young plants before they bolt.

Once the plants bolt, though, all is not lost. The lovely flowers and fine foliage are just as tasty as the regular-sized leaves, if a bit more delicate.

The plants will also eventually form seed-heads, and at least some of them will drop and self-sow. I always have volunteer cilantro plants in my garden. If you leave the seed-heads on, they will dry and you can harvest coriander.

salsa 2Lazy Summer Day Salsa with Serranos, Cilantro & Lime

Recipe copyright 2014 from Fresh From the Farm: A Year of Recipes and Stories

This fast, easy restaurant-style food-processor salsa is just as great with chips as it is with grilled steak or on top of a quesadilla. It will have a loose, not chunky, consistency.

Yields 1 2/3 cup


1/2 cup lightly packed cilantro (leaves and any upper stems—just lop the top off a bunch)

1/2 teaspoon kosher salt, plus more to taste

1/2 teaspoon granulated sugar, plus more to taste

1 large clove garlic, peeled

1 small serrano pepper, roughly chopped

2 cups cored, seeded and roughly chopped very ripe plum tomatoes (about 14 to 15 ounces or 4 to 6 large plum tomatoes)

2 teaspoons olive oil

2 teaspoons fresh lime juice, more to taste

2 to 4 tablespoons thinly sliced scallions (white and as much of green part as you like)(optional)

Put the cilantro, salt, sugar, garlic and serrano in the bowl of a food processor. Process until finely chopped. Add the tomatoes and pulse six to eight times again until very finely chopped. (Don’t overprocess. The salsa will have a very loose consistency but should still have visible small chunks of veggies.) Scrape down the sides of the bowl and add the olive oil and lime juice. Pulse once or twice until combined. Taste for seasonings, adding more salt, sugar, or lime juice if desired, and process briefly again if necessary. Transfer the salsa to a bowl and stir in as many scallions as you like (or none at all). Serve right away or store in the fridge, well-covered, for several days.

guac againDouble Cilantro Guacamole

Recipe copyright 2014 from Fresh From the Farm: A Year of Recipes and Stories

I like my guacamole bright, fresh, and a little bit chunky. I don’t add tomatoes or onions or sour cream, and I don’t pulverize the avocado, but I do think of guacamole as the perfect destination for our garden cilantro. I call this “double cilantro” guacamole because I add a little ground coriander to the mix, too. When you buy cilantro at the grocery, give it a sniff to make sure it is fragrant. Some grocery-store cilantro can be devoid of flavor during certain times of the year. You can easily double this recipe.

Yields 1 1/2 cups

1 large clove garlic

1 serrano pepper

kosher salt

2 medium ripe Haas Avocados

1/8 teaspoon ground coriander

big pinch ground cumin

2 teaspoons lime juice, more if needed

1/4 cup chopped fresh cilantro, more if needed

On a cutting board, roughly chop the garlic and the serrano. Sprinkle them with a big pinch of salt and continue to chop until the garlic and serrano are very finely minced. Transfer to a mixing bowl. Peel and pit the avocados. Cut them into rough 3/4-inch dice or pieces and add them to the mixing bowl. Sprinkle a generous 1/4 teaspoon salt, the coriander, the cumin, and the lime juice over the avocado. Using the back of a fork, gently mash and stir the avocado just until everything is well-combined but the mixture is still a bit chunky. Add the cilantro, stir again, and taste. Add more salt or lime juice if needed.

lime


On the Wings of Christmas

Two fields over and across Scotchman’s Lane lies the house of our friend Katherine Long. Less than a half-mile as the hawk flies. (And fly it does. More on that in a minute.) We trekked over to her Mermaid-and-Starfish-festooned place on Sunday for her famous Solstice potluck. Actually, we drove, though we would’ve walked if the snow really had turned from flurries to blurries like it did two years ago on the day of her party.

We had to transport our goodies—two big salads straight from the winter garden (the color of those leaves still really knocks my socks off); a broccoli, cheddar and potato frittata; and one of my all-time favorite Christmas recipes, Mrs. Lenkhe’s Cheese Sables. My friend Martha Holmberg  introduced me to these years ago, and they are almost as flaky as puff pastry and they pretty much melt in your mouth. (These, and the spicy pecans I made and crumbled into the salad would both make great nibbles to serve before your Christmas dinner.)

The spread at Katherine’s was seductive.  She’d made her real Texas chili, which is smoky and spicy with lots of ancho chiles. (She grew up in Hill Country.) My favorite. Friends helped her make dozens and dozens of deviled eggs (Katherine has sixty laying hens), and from there the list went on and on—ham, roast turkey, coq au vin, whole poached salmon, wild-rice and cranberry salad, quiche, carrot soup, house-made cheese (another of Katherine’s talents), sweets of every imaginable form, many from her good friend Rosemary Jackson. Roy and I went back for seconds…and thirds. The amazing thing is that Katherine keeps her party going from noon to 9 pm, and she invites anyone in West Tisbury who wants to come! I am so impressed and also inspired to do a summer potluck myself next year.

Tuesday afternoon I was just about to head out the door to retrieve a cutting board from Katherine’s when a Facebook post from her caught my eye. It was a photo (top of blog) of a young Red-tail hawk, in her yard, with its talons around a hen. The hawk had mauled the hen but wouldn’t let go. Katherine poured a bucket of water over the hawk and still it didn’t budge. I believe that Katherine had to wave a plastic chair at the bird before it finally flew away. But in the process she managed to get a very up-close-and-personal photo. This arresting image stopped me cold because I was still enjoying the warm afterglow of her party—looking at all the photos of friends on Facebook and even enjoying some of the leftovers at home. It reminded me that while we humans gather together snugly inside our warm houses and begin to hibernate (with full larders at our disposal), the birds and the rest of the critters outside are still desperately focused on finding food and preparing for the winter. The birds in particular seem very antsy, and every time I’ve gone outside this week I’ve gotten a birdy-y surprise.

Yesterday I caught Farmer playing with something feathery in the yard. He was just kind of tossing it around—not biting it—and it turned out to be a mostly intact dead robin. Probably it had come to feed at the new feeder Roy just hung (the cardinals are loving it) and had accidentally banged into something.  (Farmer also brought me a dead mouse this week—unfortunately this one was partially decomposed and full of maggots. Luckily I had my gardening gloves on when I reached in to his mouth to retrieve it. Yuck.) This morning our neighborhood flock of wild turkeys (5 adults and 2 juveniles) was hanging around our driveway, not 10 feet from my kitchen window, drinking water out of the puddles. I went out and shooed them away but they chose to trundle through the newly planted blueberry bushes on their way back down to the fence line. Harumph. The other day I caught one standing on top of the chicken coop.

And then, around noontime today, just as Roy was pulling down the driveway, the hawk arrived. Maybe he (or she) flew over from Katherine’s place or maybe this was a different  hawk, but more than likely they’re at least related, as we know there is a pair of adult hawks at nearby Whiting Farm that mate every year and hatch young trouble-makers. Of course, you’re not allowed to shoot a hawk (not that either of us was considering it or would really want to); you just have to be clever about scaring them off. Hence Katherine’s bucket of water. And Roy’s projectiles. He began tossing various objects at our visitor (right), who had alighted on a tree branch right above the chicken coop. The hawk didn’t even flinch at the first few missives, but finally took off—for a taller, but still nearby tree branch. Then Roy and I cornered Perky.

You see, Perky has been free-ranging this week while all the other hens stay in their protected yard, which is adjacent to their coop and covered with bird netting. Perky has been such a bad girl that we actually considered sacrificing her, but when faced with the imminent reality of that today, we quickly scooped her up and put her back in the pen…where, unfortunately, she will do what she does every day—peck at least one of the eggs that the other hens have laid.

Sometimes the damage is minimal (meaning we can still eat the egg, though not sell it or give it away) but it’s always disheartening to see the cracks. When I’m home, I rush out to the nesting boxes several times during the morning to grab the eggs as soon as they’re laid, and Perky is always lurking around waiting to pounce. One of the bigger hens will usually brood over the warm eggs—I like to think she’s protecting them from Perky, but who knows. I do know that Perky actually sat on top of Sugar one day in an attempt to get at her pretty blue egg (a favorite to peck). We have tried various home remedies to get Perky to stop pecking, but it wasn’t until this week when Roy just picked her up and plunked her outside the chicken yard that we got a perfect batch of eggs again. And as it turns out, since Perky doesn’t want to be far from the flock, she mostly just circles around the pen and doesn’t go far. Could be a good daytime solution if it weren’t for the hawks. (Our friend came back twice this afternoon.)

There’s even strange bird activity inside the house: This week our love bird, Ellie, laid two eggs. We’ve had her for two years and she’s never laid an egg. They look awfully big (bigger than a marble) for such a tiny bird, but she is very pleased with herself and sits haphazardly over the eggs all day long, puffing her lollipop-green feathers out proudly.  Thankfully these eggs aren’t fertilized, so we won’t have any baby lovebirds. Whew.

I admit, I still have a curious and not entirely loving attitude towards the birds of the world. I keep writing about them, because I am surrounded by them, and I know there is some meaning in this. (I will probably freak out when a dove flies by some day carrying an olive branch—miracle believer that I am.) Roy loves birds and our dear friend Joannie loves them. (In the photo below, that’s Joannie on the left and Katherine on the right at the Solstice party.) In fact Joannie feeds the pair of swans down at the Mill Pond twice a day. So yesterday I was baking the last of some Christmas cookies and made Joannie a special batch. Libby and I had discovered a tiny swan cookie cutter in our collection a few weeks ago, which immediately made us think of Joannie. So I’m giving Joannie the cookies and the cookie cutter for Christmas. And for right now, I think my favorite kind of bird may be the edible kind—preferably with sugary sprinkles!

P. S. Thanks to Katherine for furnishing me with the photos at top and bottom.

A Video of the Farmette, A Paella Dinner, and A Recipe for Unsellable Tomatoes

Darn it all, wouldn’t you just know it—this is the time of year when there’s so much going on at the farmette that I could write a blog every day. Except, ironically, there’s no time to write—too busy!

So today I’ll just have to give you a quick update on the goings on around here, because tomorrow I’m off to Boston to sign books at the Dewey Square Farmers’ Market, and I spent this morning cramming in the last bit of proofreading I needed to do on the galley of Fresh & Green for Dinner in order to get it off to Fed Ex in time to reach San Francisco by tomorrow. (It’s very exciting to see the design of the new book shaping up, even though publication is still many months away.)

First, great news: My friend Katie Hutchison, who kindly took care of the farmette with her husband Chris Hufstader while we were in Delaware, secretly made a video of their farm-keeping experience here at Green Island Farm and posted it on her website. Katie, who is an accomplished architect, photographer, and writer, is admittedly new to gardening and occasionally posts about her “Idjit” garden plot in a Salem, Mass., community garden. As you can tell, Katie’s not afraid to poke fun at herself, and her sense of humor is evident in the video—you’ve got to see it!

More good news: The garden is thriving (see photos) and so is the farm stand. In fact we’re pretty much selling out of everything we can harvest every day, now that the August visitors have arrived on the Island. (Obama will be here soon!) It’s killing me that we don’t have more to sell (can’t wait ‘til next year), but I’m also getting an invaluable sense of what the market wants. We’re dead on with our cherry tomatoes—all the varieties are producing well, we’re harvesting several pounds a day, and folks love the colorful pints. I just wish the beefsteak tomatoes would speed up. They’re big and fat—and very green. Our green beans are definitely getting folks to drive down the driveway, but again, it’s frustrating that we don’t have more of them (the beans, not the customers). It takes Roy and I (and sometimes a house guest!) at least a half-hour to pick them in the morning, and then we only wind up with a few pounds. But that’s how it goes.

It’s been fun to watch the farm stand traffic pick up, and I’m meeting all kinds of interesting people. One friendly couple from San Francisco (yes) has stopped by three times this week, and I had a nice conversation with two ladies from Southern Italy the other day. Sometimes an old friend who is visiting the Island will unexpectedly come down the driveway and surprise me (it happened this morning—hi Margo!).

And speaking of friends and visitors…August on the Vineyard means lots of both. And since the farmette is such a welcoming (and entertaining) place (most popular: the bunny and the rope swing), we seem to be a central gathering spot. Last week I almost cried when I stood in the backyard with two of my dear friends and former staff members from my Fine Cooking days, food writers Tony Rosenfeld and Sarah Jay. Tony was only on the Island for a day, but stopped to say hello and brought some Italian friends along with him. After touring the garden, the Italians convinced me that my arugula wasn’t too spicy!

Fortunately Sarah and her two daughters were here for the better part of last week and we had lots of time to catch up—and to cook together. Sarah is an expert in Spanish cooking and runs a successful business importing paella pans and selling all kinds of Spanish goodies from her terrific website, paellapans.com. Not only did she bring me a wonderful bottle of sherry vinegar, as well as piquillo peppers, olives, and chorizo, but she made us a seafood paella while she was here. I’m a huge fan of Sarah’s paella (recipes here), which she learned to cook while living with a family in Spain, but it was Roy’s first really authentic paella. And he loved it.

The day after Sarah left, I missed her. Right about lunch time, I started thinking about those Spanish ingredients she brought me. Hmmm. As it happens, I was also staring at a damaged Cherokee Purple (heirloom) tomato from the garden that needed to be carved up and eaten right away. (Ironically, this happens a lot – we have a garden full of lovely vegetables, but we wind up eating the overgrown beans, the holey greens, the deformed carrots, and the over-ripe tomatoes because the good stuff goes to the farm stand!) I’ve also been on a grilled bread kick, so I decided to make a grilled bread-tomato salad with olives, sherry vinegar, feta cheese (left over from a delicious salad Sarah made while she was here) and lots of fresh herbs. I guess it was an Italian-inspired salad with Spanish ingredients and a Greek twist! Whatever it was, it was delicious. So I’m passing the recipe on to you in honor of good friends and summer visitors and farm stand customers everywhere. It makes enough for two, but if you’re like me and a juicy heirloom tomato falls into  your lap, you might not want to share it.

Spanish Grilled Bread, Tomato & Fresh Herb Salad

You can use any variety of juicy tomatoes in this salad—as long as they’re juicy. (Did I mention juicy?) When you grill or toast the bread, don’t overdo it—leave it a little chewy so that it will soak up the dressing and all those tomato juices. This recipe makes a generous lunch for one or a supper side dish for two, but you can easily double or triple it to serve a crowd. I like lots of basil and mint in this (I pick the tiniest leaves from my plants and throw them in whole), but parsley, chives, or a judicious amount of fresh oregano can go in the mix, too.

___________________________________________

1 tablespoon extra virgin olive oil

2 teaspoons good-quality sherry vinegar

3/4 pound (or a little more) juicy tomatoes (a combo of beefsteak and cherry is nice), cut into small chunks or quartered if small

2 ounces feta cheese, cut into small cubes

2 1-inch thick slices ciabatta or other narrow loaf artisan bread, brushed generously with olive oil, sprinkled with salt, and grilled or broiled until toasty, cut into small cubes

8 to 12 Spanish green olives, smashed and pitted

1/4 teaspoon minced fresh garlic

1/4 cup small whole herb leaves (basil and mint)

kosher salt

_____________________________________________

In a small bowl, combine the olive oil and sherry vinegar. Set aside.

In a medium mixing bowl, combine the tomatoes, feta, bread, olives, garlic and half of the whole herbs. Sprinkle with salt and pour over the olive oil-vinegar mixture. Toss and mix well. If desired, toss and let sit for 15 minutes to let the bread absorb the tomato juices (but it isn’t necessary). Turn out into a pretty shallow serving bowl and garnish with the remaining herbs.

Serves 2

We Brake for Farm Stands — and Fairy Tale Eggplants

The car was packed to the gills—no lie. We rearranged the sleeping bags, two coolers, bags of beach towels and bathing suits, two beach chairs, and one hermit crab in a small cage to fit three blueberry bushes into the way back. Gifts from my Dad, the blueberries–in our minds–already had a home in our garden. No way were we leaving them in Delaware. We tucked Libby and her stuffed animals Croc and Humphrey into a small spot in the back seat, next to three flowering annuals we’d bought on the way down. And off we went, leaving Lewes early Monday morning for the long drive (and ferry ride) home to Martha’s Vineyard. At least the outside temperature was a cool 88—16 degrees cooler, in fact, than on the drive down. (Yes, that’s 104 degrees F.)

With a full car and nine hours of highway ahead of us, we had no business braking for farm stands. But we did. Pretty soon we were cramming bags of Silver Queen corn into any fissure we could find. The nice farm stand guy at one place talked us into a new variety of melon – something called Candy Orange, a cross between a honeydew and a cantalope. A couple quarts of fresh peaches, a box of blueberries, and a few other fruits later, the car began to smell. Not a bad smell, just a very fragrant, perfumey smell. Roy thought it was rather mango-ish. All I could think about was whether the fruit would make it back without rotting or bruising something terrible. What I like best about farm stand fruit is that most of it is picked ripe or nearly ripe. But that means long car travel is about the worst way to treat these fragile babies.

Most of the fruit survived (except one juicy peach that Libby and I shared in the car, random rest-stop napkins grabbed to catch the drips) as did the other goodies we nabbed at the farm stands. Silly me, I fell in love with something new – a box of little Fairy Tale eggplants – only to remember when I got home that I actually grew a few of these in my first garden on the island. (Photo at top left is evidence. Memory loss is worse than I thought, I guess!) I am a sucker for mini vegetables (like the little pattypan squash we grow and sell), so when I saw these I instantly thought we should grow them for our own farm stand next year. And maybe we will. In the meantime I had to figure out what to do with some of them today (a quart is a lot!). (Fortunately, many of the other goodies went straight away to the kind friends who looked after the chickens, the farm stand, and the garden while we were gone.)

From some other vague part of my brain came the memory of eggplant “fans.” I thought this would be a cool and pretty idea for the little mini eggplants, and so I sliced away. I trimmed the tops of the fruits just enough so that they still hung together, and cut about four parallel lengthwise slices just a bit shy of the tips to make the “fans.” I brushed each slice with olive oil, sprinkled with salt, and lit the grill. Ten minutes later I had lunch. Just three or four minutes on each side was enough to cook these eggplants through (I hate undercooked eggplant). The skin was tender, the flesh soft, and the flavor, well—clean and sweet. Not quite as deep and earthy as a big globe eggplant, but not the least bit bitter or seedy either. I wound up smearing some of my slices with a little extra Humboldt Fog goat cheese our farm-keeping houseguests left in the fridge for us. Wow—that was a killer pairing. But the grilled eggplant would be great lots of ways: dressed with salsa or a drizzle of chimichurri, in a salad with arugula, fresh mint and a lemony vinaigrette, or just on their own as a cute side, antipasto, or starter. Farm stand finds are fun, huh?

P.S. Culinary highlights from the weekend in Delaware included a Fast, Fresh & Green signing at the wonderful Historic Lewes Farmer’s Market, my sister Eleanor’s delicious baby back ribs, and a trip to Hopkins Farm Creamery for cow-fresh ice cream (complete with barnyard smells). We didn’t get a chance to eat crabs, pick beach plums, or pan-fry some scrapple on this trip—next year!

P.P.S. My camera has met a sad fate, so I beg your patience while I research a new camera (and rob a bank to pay for it!).

Mustard Greens Are the New Baby Bok Choy – Really!

Who knew baby bok choy was such a star? It seems to be the most popular vegetable on the Island right now, and the little bit of it I planted in May is pretty much gone. I have another young patch coming along, but it prefers cool temps, so I’m afraid the weather might be too hot when it matures. In the meantime, while I wait for my next cooking green to get big enough to harvest (Swiss chard is close), I’m picking mustard greens to sell.

I’ve noticed that since I wrote “Mustard Greens” on the farm stand sign (instead of “Baby Bok Choy”), we’ve had fewer people pulling into the driveway. Well, harrumph! Doesn’t everybody know how tasty mustard greens are, too?! Okay, seriously, if I were to be honest I’d have to tell you that mustard greens are not as groovy as baby bok choy. For one thing, they don’t have that stand-up texture. But they are strangely delicious in a very arresting kind of way. If you like spicy mustard of any sort—and you’re looking for a powerhouse nutritional kick—give mustard greens a try. (They’re not only purported to lower cholesterol, but they contain unique cancer-fighting phytonutrients and lots of Vitamins A, C, and K.)

I especially like the young tender leaves I’m harvesting now because they don’t need par-boiling—just a quick turn in the sauté pan. Super quick and easy. Ginger and garlic both are natural partners for mustard greens, and not surprisingly, the spicy greens do really well with just a touch of something creamy to offset the zing. For me that creamy thing is often goat cheese. I’ve been making a really simple lunch/snack of toasted or grilled bread with sautéed mustard greens and a bit of warm goat cheese on the top (recipe below). I guess I have goat cheese on the brain these days, too.

There’s one last reason why mustard greens are my heroes this spring. For some reason those wily flea beetles danced right past them on their way to the Tuscan Kale. (This was not good news for the kale, unfortunately.) Normally flea beetles feast on anything in the brassica family, including the milder mustard relatives, mizuna and tat soi (in the photo at right, top), that I put in my salad mixes. But they didn’t linger on the mustard greens, leaving them nice-looking enough to sell. Whew. The greens grow so quickly, too, that I’ve been able to harvest baby leaves for salad and come back the next day to find the rest of the leaves on the plant 6 inches tall–perfect for cooking. You could live on this stuff. Really.

Toast with Sautéed Mustard Greens and Warm Goat Cheese

This recipe is more like a thought-starter, so feel free to jiggle it around as you like. You probably have a favorite method for toasting or grilling good bread, too, so use it.  This makes a nice snack or light lunch for one person, but scale it up as much as you want to serve more, or turn it into a crostini for starters. Remove the tough stems from the mustard leaves before ripping them into smaller pieces. If you only have mature, large mustard greens, you would want to parboil them 3 to 4 minutes first and drain well before sautéing.

1 oval slice Artisan bread (about 6 or 7 inches long and cut 1/2-inch thick), cut into two pieces

extra-virgin olive oil

kosher salt

1/2 teaspoon minced garlic

2 to 3 ounces mustard greens, stems removed, leaves torn into small pieces (about 2 cups), washed and spun dry

2 tablespoons crumbled fresh goat cheese (or queso fresco or other cheese if you prefer)

Heat the oven broiler on high and arrange a rack 4 to 6 inches from the heating element. Put the bread on a baking tray or cookie sheet. Brush one side of the bread with a little olive oil, sprinkle with a little salt, and broil until lightly browned. Set the toast aside on the sheet tray. (You can lightly brown the other side, too, if you wish, though leaving the bread a little soft in the middle is nice.)

In a small skillet, heat 1 teaspoon olive oil over medium heat. Add the garlic and cook, stirring, just until softened and fragrant, about 30 seconds. Add the mustard leaves and a pinch of salt and cook, stirring, until wilted, about 1 minute. Remove from the heat.

Pile the mustard greens on each of the two bread pieces and crumble the goat cheese or other cheese on top. Place back under the broiler and cook just until the goat cheese is warmed and softened.

Serves 1