Tag Archives: Tools

For Stress-Free Veggie Grilling, Grab a Basket

Between rain drops this week, we’ve been firing up the grill a fair amount. My very favorite place to shop for veggies – the farm stand at Morning Glory Farm – finally opened up for the season. So I saddled up the Honda, headed down to Edgartown, and robbed the place. Not literally of course. But I did come away with a stash of valuable veggies, things that Morning Glory is already harvesting from their own fields and greenhouses. Among other items (like a tee shirt and a strawberry muffin), I nabbed baby bok choy, purple-tipped asparagus, scallions, and tiny mustard greens.

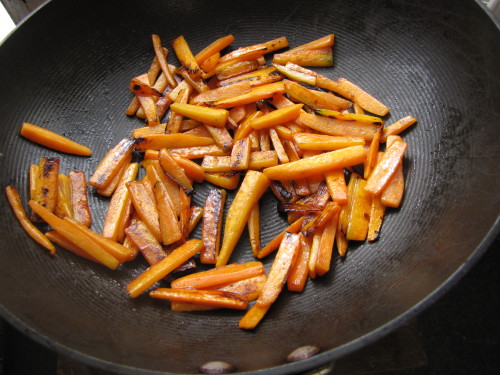
Since we’ve been working in the garden late every day, I’ve been dreaming up simple dinner ideas, too. (For a dozen weeknight ideas, read the blog I wrote for the Huffington Post this week.) I love grilled veggies, but sometimes prepping veggies for the grill, and then standing vigil over them patiently, is just a little more time than even I’m willing to give. So this week I grabbed my grill basket to make life easier. And I wound up improvising a number of different veggie dishes, using both my Morning Glory haul and the contents of my refrigerator veggie bin. (Just two samples–in the basket above, and finished, below.)

Grill baskets are inherently destructible. They won’t last forever, so don’t bother spending a lot of money on one. Just buy one—you won’t be sorry. (Mine is a particularly cheap, lightweight one that I picked up at a housewares store. But this new stainless steel one from Weber looks like a good bet.) Basically, using a grill basket is like stir-frying on the grill. But better. Because you don’t have to pay close attention. Stirring every three or four minutes, as opposed to every 30 seconds, is just fine. As long as you follow a few guidelines, you can cook practically any combination of your favorite veggies in about 10 minutes of mostly hands-off time.

Here are a few tips for cooking veggies in a grill basket:

1. Choose a combination of veggies that are loosely similar in density and moisture content. Broccoli, cauliflower, carrots, sugar snap peas, young beans, bok choy, broccoli raab are all fine. (Yeah, I’m defining density very loosely here). Don’t use potatoes or roots other than carrots here. It’s also fine to throw in a hearty leafy green like cabbage or radicchio—delicious if you don’t mind a few charred edges. But don’t use delicate greens like spinach here unless you toss the leaves in at the end of cooking.

2. Cut all those veggies into pieces about the same size. Then augment them with at least some peppers, onions or mushrooms—aromatic veggies that give off moisture as they cook. The aromatics not only spread flavor around but they help all the other veggies cook, too.

3. Estimate how many veggies you’ll need by putting the raw veg into the (cool) basket. Mine feels fullish with 3 to 4 cups veggies. You want your basket to be slightly overcrowded. With the grill lid-down (and only occasional stirring), the indirect (oven-like) heat of the grill, along with the moisture the crowded veggies will give off to each other, will help cook the veggies cook through while they brown.

4. Be sure the veggies are thoroughly (but not excessively) coated with oil. You need the oil to draw the heat in and cook the veggies. Season with kosher salt, too.

5. Preheat the grill with the grill basket in it for 5 to 10 minutes. Cook over medium heat (unless your grill is really old and slow—then medium-high.) The veggies are done when they are all limp, tender (some will be crisp-tender), and gently browned in places.

6. When the veggies come off the grill, you can do almost anything with them. We like to toss them with a compound butter (fresh herbs, citrus zest, salt), which is quick and easy to make. Then sometimes we take it a step further and toss the seasoned veg with whole wheat spaghetti or another pasta and call it dinner (or a big part of dinner). If you like the compound butter idea, I’ve included a formula below for making one. You might not use the whole batch on the veggies; use any extra with your eggs in the morning or on a steak tomorrow night.

Compound Herb Butter: In a small bowl, combine 2 tablespoons well-softened butter with 1/2 tsp. citrus zest, 1/8 teaspoon kosher salt, 1 1/2 teaspoons finely chopped fresh tender herbs (chives, mint, parsley, cilantro, basil), and 1 teaspoon honey or maple syrup (optional). Mash with a wooden spoon until well-combined. Store tightly covered in the fridge for up to 3 or 4 days.

Christmas Presents Past and Future

Today I made up an imaginary friend named Shorty. I was writing a head note for a recipe (one that involves short-grain brown rice) and was fresh out of clever things to say. This is what happens when you agree to write a book quickly—your creativity gets taxed mightily. So much so, in fact, that no new recipe blog is coming forth from me today.

Instead I decided to write (quickly) about the other thing that is very much on my mind—Christmas shopping. I have, in fact, barely done any yet, which is Not Good. I can’t do much about that right this minute, but I thought maybe I could help you, since probably you have an equivalent of a book deadline hanging over you and are behind with your own efforts. Or maybe some wonderful friend or your husband or your mother wants to know what you want for Christmas.

Here are five ideas. They just happen to be some of my favorite kitchen tools. People often ask me about kitchen equipment. Sometimes the questions are real stumpers, like whether they should buy the newest combined microwave-convection-infrared-lightspeed-oven, whereupon I stare at them blankly since I haven’t been in the market for a new stove in 10 years. But when it comes to simple kitchen tools, I can babble on (my specialty).

My very favorite thing is a pink-handled knife from Kyocera. Well, honestly, it’s not the color of the handle that did it for me (yes, pink is my favorite color), though I do love the fact that every purchase of this knife sends $5 to the Susan G. Komen Breast Cancer Foundation. It’s the ceramic blade—so darn sharp, and it has been that way every day that I’ve used it for the past five years (which is almost every day). The Santoku-shaped blade is only 5 1/2 inches long, so this isn’t your big chopping knife; I think of it more as a utility knife. I use it for thin-slicing potatoes, cutting up broccoli florets, slivering garlic, halving Brussels sprouts, trimming green beans…lotsa things.

The tool I use most in the kitchen—maybe even more than my ceramic knife—is a pair of OXO tongs. Three pairs, actually (two 9-inchers, one 12-incher.) I think I first got attached to tongs when I worked in restaurant kitchens, where pot holders don’t exist. (Come to think of it, neither do most common kitchen utensils.) You can use tongs to pull out hot oven racks and sheet trays, turn over delicate veggies or meats while sautéing, move anything around in a pan, or, of course, to handle anything on the grill. I particularly like the grip and the locking mechanism on the OXO Good Grips tongs.

I eat and cook with a lot of eggs, so I’ve messed around with many whisks. The silicone-coated balloon whisk from Le Creuset is the most efficient whisk I’ve ever used. I flick it around a few times and voila, my eggs are perfectly mixed. It’s a little bottom-heavy so occasionally it does fall out of a bowl, but I love it (and its color) nonetheless.  I probably don’t need to say anything about silicone spatulas other than, if you only have one or two—buy more! I have them in a rainbow of colors and sizes (I like a spoonula shaped one, too) from both OXO and Le Creuset. I still have my wooden spoons, but they spend more time looking good in an old ceramic baked-bean jar than my silicone spatulas, which hit the pans (especially nonstick ones) every day.

Lastly, I don’t know what I ever did without a Microplane® zester for zesting lemons, limes, and oranges. I love to use zest as a flavor booster in pan sauces, rice dishes, salad dressings, flavored butters…and this tool just makes getting that feathery zest (minus the bitter pith) a breeze. Use it for finely grating Parmigiano, too. I like my funky original one so much that I haven’t invested in one of the many newer ones with comfortable handles, but you could.

One last Christmas idea: Buy a goat! No, I haven’t completely lost it—yet. I just happen to love this idea: Instead of (or in addition to) giving an actual material gift to one of your friends,  OXFAM America will let you “buy” (make a donation in a certain amount) a gift (in your friend’s name) for a community in need. ($25 will buy a school lunch program for one child, $30 a vegetable garden for one family. The goat—a great source of milk, fertilizer and food in hardscrabble areas, is $50!) Your friend will get a Christmas card letting him or her know the donation has been made. I’m not saying you need to skip the kitchen goodies—just that one of these cards tucked next to the spatulas in a Christmas stocking might be in the true spirit of things.

Wherever your gift buying or gift giving leads you this holiday season, I hope you can keep that true spirit close by. Spend time with your friends—and not just the imaginary ones!

P.S.  Oops, I almost forgot. I know this is really not in the true spirit of Christmas (blatant self promotion—I don’t think so), but remember that Fast, Fresh & Green makes a great Christmas present, too! Be sure to try and patronize your local bookstore this season if you can.

Don’t be a Wok Snob—You’ll Love this Stir-Fry Pan

It took me a while to cozy up to nonstick stir-fry pans—those wide, sloping pans that are shaped like a salad bowl as opposed to a conical, flat-bottomed wok. Like a lot of folks, I thought you could only really use a wok for stir-frying.  And in a way, that’s true. A non-stick stir-fry pan won’t give you wok-seared vegetables. But it will give you something delicious. The trouble with wok cooking at home is that most of us don’t have the recessed burners and leaping flames needed to surround the sides of the pan. With that conical, flat-bottomed shape on a home stove, veggies tend to cook unevenly.

This thing called a stir-fry pan does something pretty cool, even if it’s not exactly stir-frying. Something, in fact, that’s a boon to weeknight veggie cooks. It browns and steams at the same time, producing deliciously flavored and cooked-through veggies. It’s perfect for somewhat dense vegetables (like broccoli, cauliflower, and carrots) that benefit from the added flavor of browning, but that need some moisture to cook through. (See Gingery Stir-Fried Carrots with Cranberry and Orange.) The huge and continuous surface area of the stir-fry pan means that the veggies get lots of contact with heat so that they get a chance to brown up. But the slope and depth of the bowl also mean that the veggies steam a bit as they’re tossed around together. All you have to do is stir.

The pan does an equally stellar job on quicker-cooking veggies like asparagus, pepper, onions, and mushrooms. And it’s the perfect vessel for cooking greens like chard, spinach, and bok choi, though you won’t get browning with these veg.

Over the years, I’ve also had to overcome my aversion to nonstick interiors. (I’m still really partial to stainless-steel-lined pans—like my favorite straight-sided sauté pan—for anything that’ll you’ll want to finish with a pan sauce. The yummy brown stuff that builds up on the bottom of the stainless steel pan is the foundation for the tastiest of sauces.) But for a simple stir-fry, I like the fact that I don’t have to use as much oil in the nonstick pan, and that the whole experience is less sticky and more fluid.

It’s true that this pan isn’t going to give you wok-seared results; but what it does deliver is something pretty delicious.  My favorite nonstick 12-inch stir-fry pan is a Circulon, available on Amazon for about $40.